
Start Here: Guide, Manual, FAQs, How to Update
Getting Started
To begin using Lemony, set up your first Lemony Node and follow the Lemony Single Node Setup.

To set up a Lemony Cluster, start by following the Lemony Single Node Setup guide. Completing this foundational setup streamlines the process of adding more Lemony Nodes, allowing you to seamlessly grow your private AI Cluster.
Buttons and Ports Overview
Before we begin, familiarize yourself with the buttons and ports on the Lemony device. These hardware features will assist you during setup and use:
Front Panel
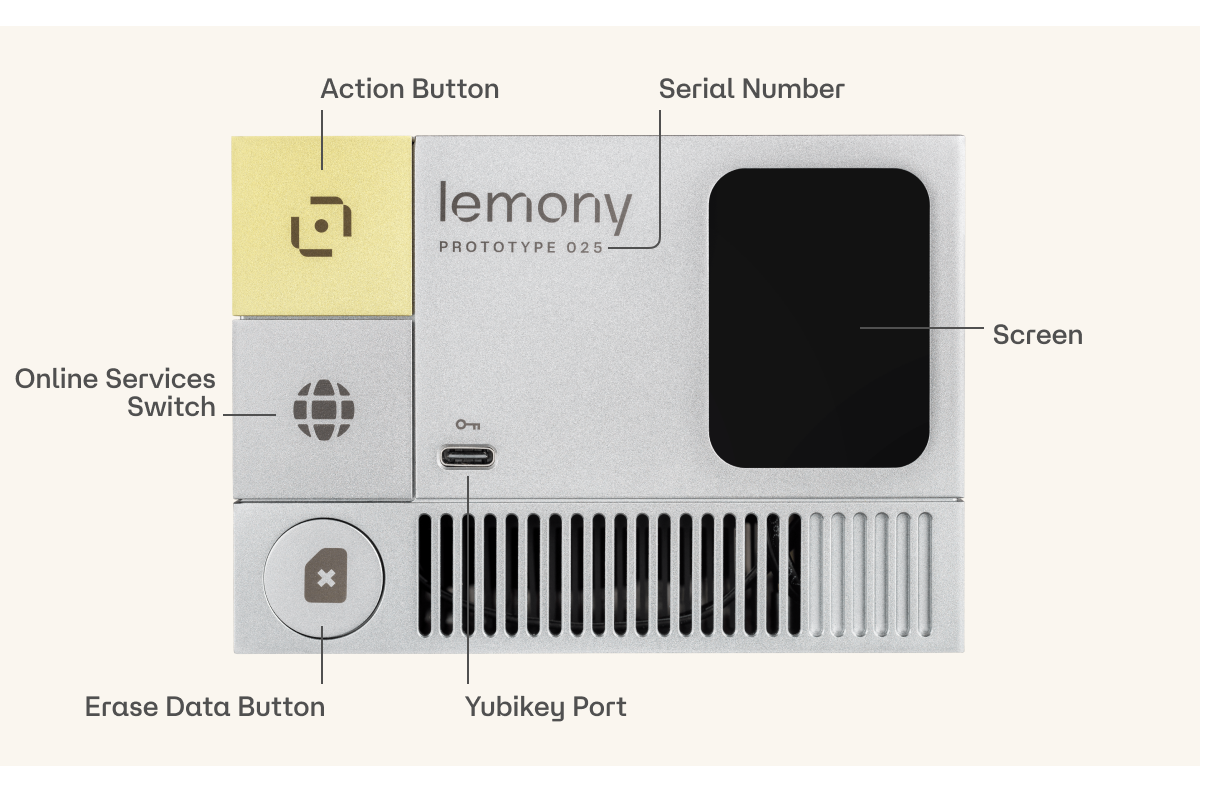
- Action Button: This button powers the device on/off and can also be used for quick actions like restarting;
- Online Services Switch: A physical button to enable or disable online services at the hardware level;
- Erase Data Button: Securely delete all data on the device by following on-screen instructions;
- Yubikey Port: This port will allow users to set up advanced security features(Coming Soon);
- Screen: Displays Lemony’s current status, system instructions, and help messages. Most importantly, it shows the IP address you need to connect to the device.
Back Panel
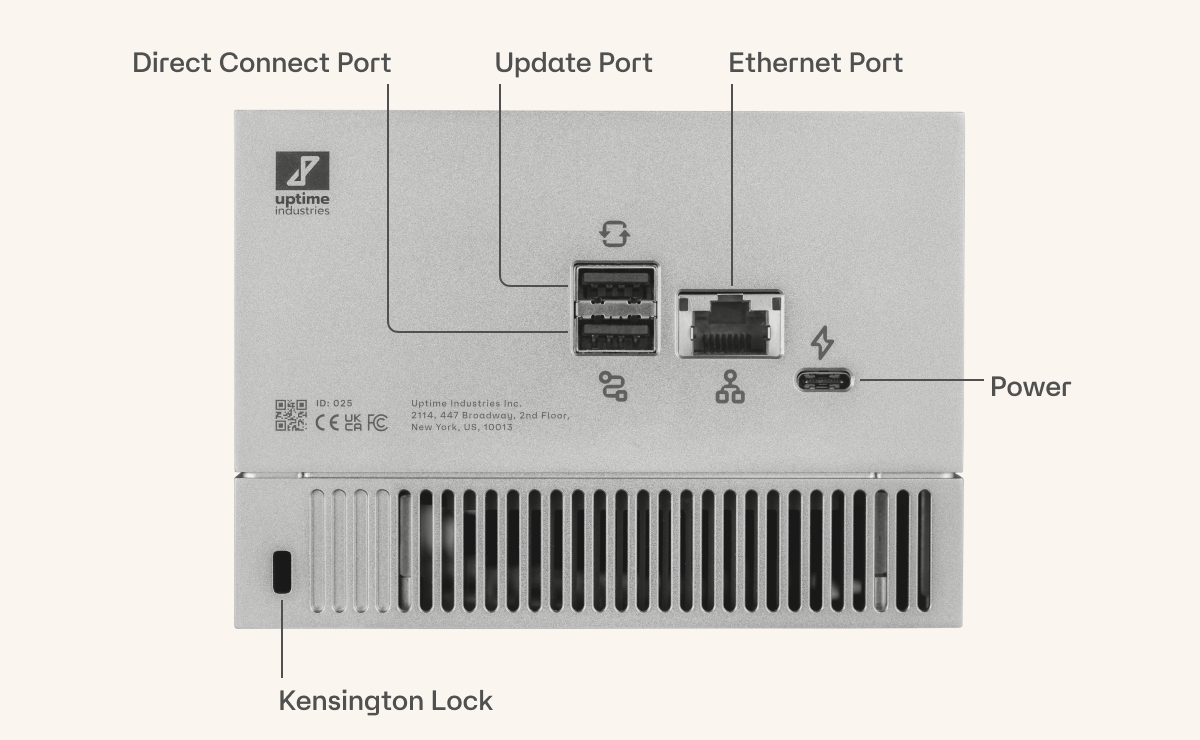
- Direct Connect Port: Use this port to connect Lemony directly to a PC with the special direct connect cable included in the bundle. Ideal for individual use.
- Ethernet Port: A port for network connections, supporting both individual and team use.
- Update Port: Dedicated port for USB sticks containing software updates.
- Kensington Lock: Slot for securing the Lemony device with a Kensington lock.
- Power: Power input port that uses a USB-C cable to provide energy to the device.
Lemony Node Package Contents
- Lemony Node;
- Direct Connect Cable;
- Direct Connect Lemony Adapter;
- RJ45 Network/Ethernet Cable;
- 100W USB-C Power Adapter – 230V/110V;
- Quick Start Guide.
Lemony Node Setup
Since Lemony operates entirely locally and offline, please note it won’t be accessible unless you are directly connected via USB Type-C or are on the same local network as your Lemony Node.
Required Items
- Lemony Node;
- 230V/110V Power Outlet;
- Your end device (laptop or PC). MacOS, Windows, and Linux are supported;
- Data Connection Setup:
- Direct Connect: Direct Connect Cable and USB Type-C on your end device;
- Local Network Connect: Ethernet Cable and RJ45 Network outlet.
Choose Your Usage Method
Direct Connect
Allows a single user to operate the Lemony application via a direct USB-C connection between Lemony and your end device.
Local Network Connect (recommended)
Enables multiple users to work simultaneously on Lemony through your local network.
Direct Connect — Single User
The Direct Connect option allows a single user to operate the Lemony application via a direct USB-C connection between Lemony and your end device. This method is ideal for individual use when you need a dedicated, one-on-one connection.
Features of Direct Connect:
- Simple and quick setup for individual users;
- No network configuration required;
- Best for users working alone or in offline environments.
Steps

- Connect power only using the supplied power adapter (USB Type-C). Plug it into the designated Power Input port on the back of Lemony;
- First, connect the USB-C cable;
- Then, plug the power adapter into a 230V/110V outlet;
- Assemble and connect the Direct Connect adapter to the USB-A port on the back of Lemony;
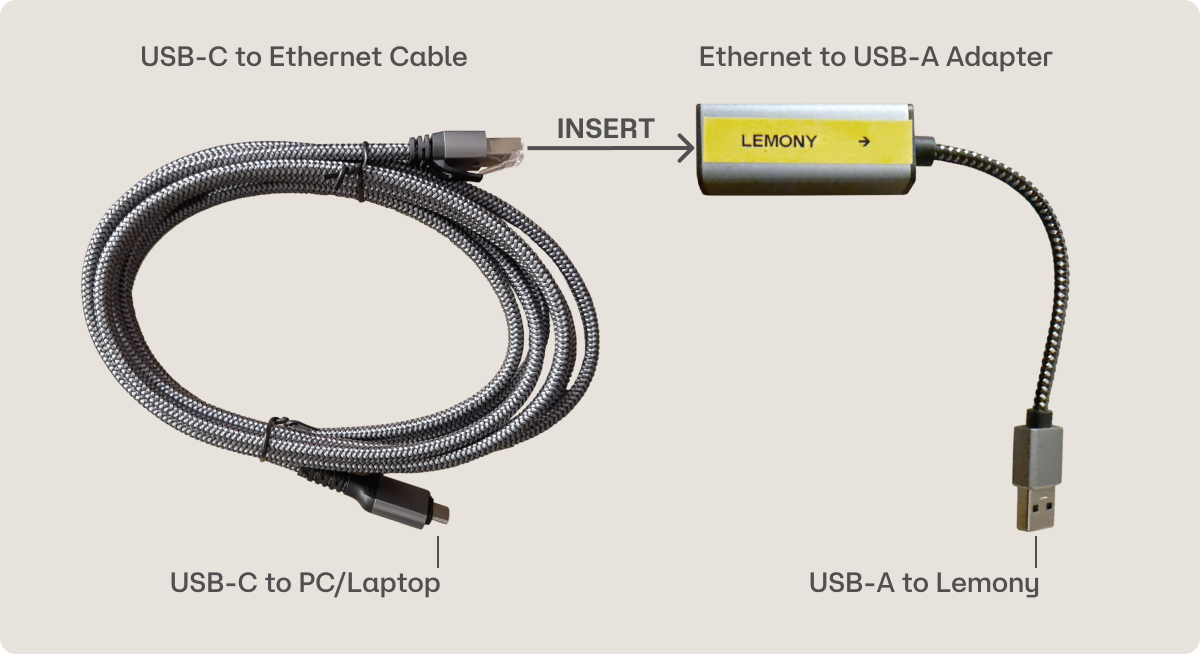
- Connect the Direct Connect cable between the Direct Connect adapter and the USB-C port on your end device;
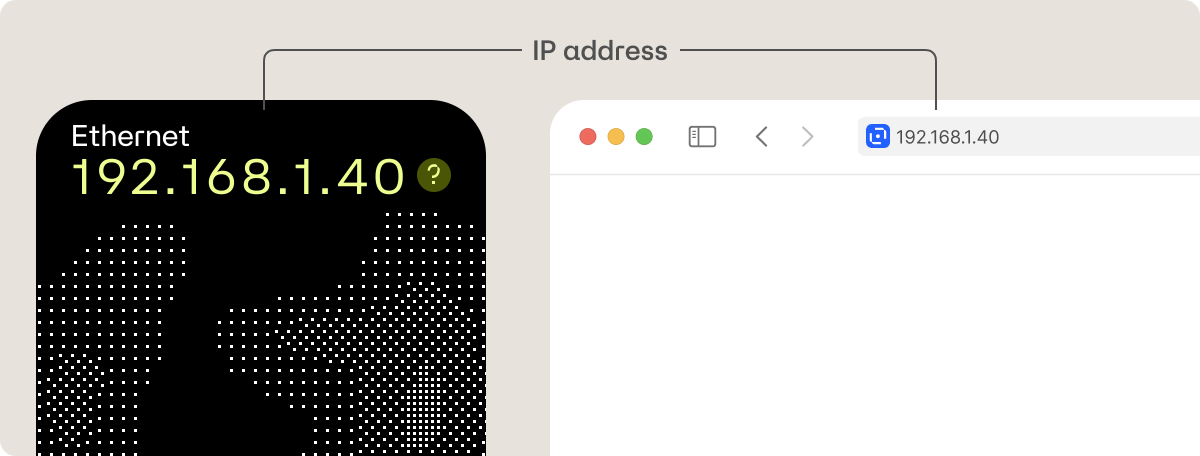
- Wait up to 30 seconds for your local IP address to appear on the Lemony display;

- Your Lemony Node setup is now successfully completed. Enter displayed IP address to your browser address line and press enter to open Lemony App. Make sure there is no https:// before IP address.
Now you can explore Lemony Application
Local Network Connect — Multi-User
The Local Network Connect option enables multiple users to work simultaneously on Lemony through your local network. This setup is ideal for team environments, offering enhanced collaboration and accessibility.
Features of Local Network Connect:
- Supports multiple users accessing Lemony at the same time;
- Seamless integration within your local network environment;
- Recommended for team use and shared workflows.
Steps
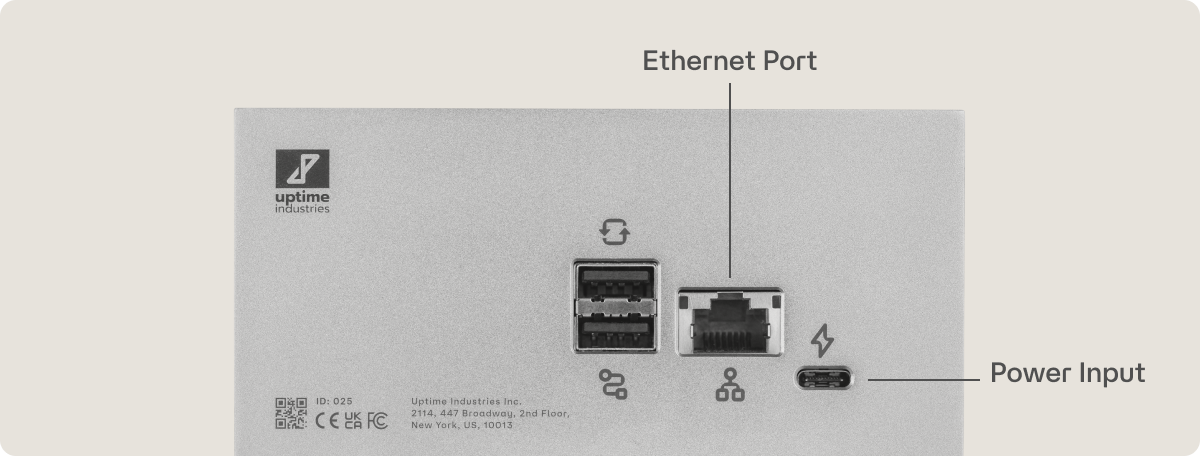
- Connect power only using the supplied power adapter (USB Type-C) to the designated USB-C port on the back of Lemony;
- First, connect the USB-C cable;
- Then, plug the power adapter into a 230V/110V outlet;
- Connect the Ethernet cable to the Ethernet Port on the back of the Lemony Node;
- Connect the other end of the Ethernet cable to an active, tested RJ45 network outlet with local network access;
- If there are specific network rules, firewall settings, or port configurations, please contact your system administrator and provide them with the necessary information;
- Wait up to 30 seconds for your local IP address to appear on the Lemony display;
- Your Lemony Node setup is now successfully completed. Enter displayed IP address to your browser address line and press enter to open Lemony App. Make sure there is no https:// before IP address.

Now you can explore Lemony Application
Connecting Additional Lemony Nodes
to an Existing Setup
For growing teams and advanced workflows, Lemony supports a stack-to-scale architecture that allows you to connect multiple Lemony devices within the same network.
Lemony Nodes types:
- Primary Node: Acts as the central hub, orchestrating workflows and managing core AI models;
- Booster Nodes: Supercharge your system by handling more users, tasks, and processing with ease;
- Extender Nodes: Add specialized AI models to Assistants, enabling advanced and unique workflows tailored to your needs.
This scalable setup ensures unmatched performance, flexibility, and efficiency as your organization grows.
Steps
- Connect power only using the supplied power adapter (USB Type-C) to the designated Power Input port on the back of Lemony;
- First, connect the USB-C cable;
- Then, plug the power adapter into a 230V/110V outlet;
- Connect the Ethernet cable to the Ethernet port on the back of the Lemony Node;
- Plug the other end of the Ethernet cable into an active, tested RJ45 network outlet with local network access;
- If there are specific network rules, firewall settings, or port configurations, please contact your system administrator and provide them with the necessary details;
- Wait up to 30 seconds for your local IP address to appear on the Lemony display;
- The setup of your additional Lemony Node is now successfully completed. Now go to application and adopt additional Lemony.
Lemony Nodes Adoption
- Ensure that each of your Lemony Nodes displays an IP address on their screens;
- Open your Lemony local web application;
- Navigate to AI Models → I have one more Lemony and complete the setup wizard;
- Enter IP address from additional Lemony to field and click "Adopt" button;
- Once the setup is complete, you'll see the Booster title on your adopted Lemony. You have successfully scaled your local Lemony AI cluster.

Lemony Application Setup
Complete the initial Lemony Node setup first.
Please note that the Lemony application will only be accessible if you are connected directly via a Direct Connect cable or if you connect Lemony to your local network via an Ethernet cable.
Local Web Application
- In an up-to-date web browser (Chrome recommended), enter the local IP address displayed on your Lemony Node.
- For the first login, enter your desired username and password to set up your admin account.
- First registered user gets Administrator rights that includes:
- Access control
- AI model control
If you cannot access the Lemony app, make sure there is no https:// in front of the IP address.
Lemony Application First Steps
Invite Users
To invite additional users, go to the User Management tab. Up to 5 users can work on a single Lemony Node simultaneously.
Upload Documents/Files into Your RAG
Upload your first documents into designated folders. Organize all your business documents as needed, and after a one-time indexing process, their information will be instantly accessible with no additional wait time. For large uploads, we recommend performing the one-time indexing overnight to ensure all information is readily available the next day without delay.
On your Lemony you have a full, local semantic and agentic RAG for continuously grounding your models organization specific based on your organizations knowledge, files, documents.
Chat
The chat is your project- or task-specific workspace where you can link documents or other resources to your prompts, helping you get precise answers efficiently.
Private Chat
Private chat gives you the advantage of discussing sensitive topics and proprietary information without worrying about data leakage or unauthorized access. Lemony's offline operation ensures that your confidential discussions remain private and secure.
Use the chat to ask questions, assign tasks or seek advice. Lemony is equipped to handle a variety of tasks such as summarizing documents, brainstorming ideas or even writing reports.
You can add documents from the document library or upload them directly to the chat without making them visible to other users. Files uploaded directly to the chat will only be saved for that chat and will not be added to the Documents Library.
Team Chat
Team chat works as a regular group chat with the ability to ask @AI when needed.
By using Team Chat, users can benefit from collective insights, brainstorming sessions and shared knowledge as they work together to achieve common goals in a secure offline environment. Because Team Chats are shared, they are visible to all Lemony members.
Chat with File or Folder
Start a new chat by adding the files you need, or navigate to Shared Documents, click the three dots icon next to a file, and select Start Chat. To chat with a folder, use the Chat button located at the top of the folder page.
AI Models
Admins can now switch between multiple LLM models from a predefined list, tailoring Lemony's capabilities to suit specific team needs.
Assistants
Lemony allows users to create custom Assistants, giving you the flexibility to design AI helpers perfectly suited for your specific tasks and workflows. These Assistants can be fine-tuned by adjusting various settings to ensure they perform exactly as needed.
Delete or Reset
This can be done by the Administrator from the Settings section.
Find the Nut icon at the bottom of the left menu and follow the instructions.
Updating Lemony
With your Lemony subscription, you receive quarterly updates (4 times per year) to the latest AI models and Lemony Node software. Updates are provided on a pre-configured USB stick, which will be mailed to you. To update your mailing address, please contact us at sales@lemony.ai.
Use this instruction to update Lemony
FAQs
- How do I transition from single-user direct connect (USB Type-C) to multi-user local network setup?
First, disconnect the power from your Lemony Node, connect an Ethernet cable to an active RJ45 network outlet, and then reconnect the power. Once powered on, the Lemony Node will display its IP address for multi-user access over the network.
- How can I scale up with multiple Lemony Nodes (Stack-to-Scale)?
You can expand your setup by adding additional Lemony Nodes to increase processing power and user capacity. Connect each new node to the local network, power it up, and use the Multi-Node Setup in Settings to configure.
- What if I need more than 5 users?
A single Lemony Node supports up to 5 concurrent users. For more users, consider adding additional nodes to your setup, as each new node increases the supported user capacity.
- Which LLM models are used and supported?
Lemony supports a range of Large Language Models (LLMs) tailored to business needs. For details on available models, refer to your documentation or contact support.
- How can I get help with my Lemony setup?
For assistance, reach out to support@lemony.ai, consult your user manual, or contact your dedicated Lemony representative.
Support
For assistance, reach out to support@lemony.ai, or using WhatsApp.


